1. Choosing the Right Vinyl Plank Flooring
When it comes to selecting the perfect vinyl plank flooring for your space, several factors need consideration. First and foremost is the durability of the material. Look for vinyl planks with a high wear layer, which will ensure they can withstand heavy foot traffic and daily wear and tear. Another important factor is the thickness of the planks. Thicker planks tend to be more stable and better at masking imperfections in the subfloor.
In addition to the practical aspects, the visual appeal of the vinyl plank flooring is important. Consider the color, texture, and overall aesthetic to ensure it complements your existing decor. Furthermore, look for planks with a reliable locking system for easy installation, and consider options with added features such as water resistance or scratch resistance for high-traffic areas. By carefully considering these factors, you can choose the right vinyl plank flooring that meets both your practical and aesthetic needs.
When shopping for vinyl plank flooring, it’s also essential to consider your budget. While higher-quality materials may come with a higher price tag, they often offer better durability and longevity, making them a worthwhile investment in the long run. In contrast, budget-friendly options may still provide a stylish look and serve their purpose well in low-traffic areas. Ultimately, understanding your needs and priorities will guide you towards the right choice for your vinyl plank flooring.
2. Preparing the Subfloor
When it comes to installing new flooring, one of the most crucial steps is preparing the subfloor. Proper preparation ensures a level, smooth surface for the new flooring to be installed on, preventing future issues and ensuring longevity. Whether you’re working with concrete, plywood, or another type of subfloor, the preparation process is essential for a successful flooring installation.
One of the first steps in preparing a subfloor is to thoroughly clean the surface. Any debris, dust, or dirt should be removed to ensure proper adhesion of the new flooring material. Additionally, it’s important to check for any protruding nails, staples, or screws that may need to be removed or driven in to create a smooth surface.
After cleaning the surface, it’s important to address any imperfections. This may involve filling cracks or gaps with an appropriate filler material and leveling uneven areas to create a flat subfloor. Ensuring that the subfloor is free of dips, bumps, and other imperfections is essential for a successful flooring installation.
In some cases, it may be necessary to apply a primer or moisture barrier to the subfloor to prevent issues such as moisture infiltration or adhesive failure. This step is particularly important when installing certain types of flooring, such as hardwood or laminate, where moisture can cause significant damage.
Properly preparing the subfloor is a critical step in the flooring installation process. Taking the time to clean, repair, and level the subfloor will create a solid foundation for the new flooring, ensuring a professional and long-lasting result.
3. Installing the Underlayment
When it comes to installing the underlayment for your flooring, it’s important to start with a clean and level subfloor. Whether you’re working with hardwood, laminate, or vinyl, the underlayment provides a smooth surface and helps to reduce noise. Begin by rolling out the underlayment material and cutting it to fit the room, leaving around a 1/4 inch gap from the walls. Use a utility knife to trim the excess material as needed, ensuring a precise fit.
Once the underlayment is in place, ensure that the seams are properly aligned and secured. Many underlayment materials come with adhesive strips or tape to make this process easier. Additionally, consider using a moisture barrier underlayment if your floor is being installed in a high-moisture area or over a concrete subfloor. This added layer of protection can help prevent any moisture-related issues down the line.
One important step to remember is to acclimate the underlayment to the room’s temperature and humidity for at least 48 hours before installation. This will help prevent any expansion or contraction of the material after it’s installed. With the underlayment properly in place, you’ll be one step closer to achieving a professional and long-lasting flooring installation.
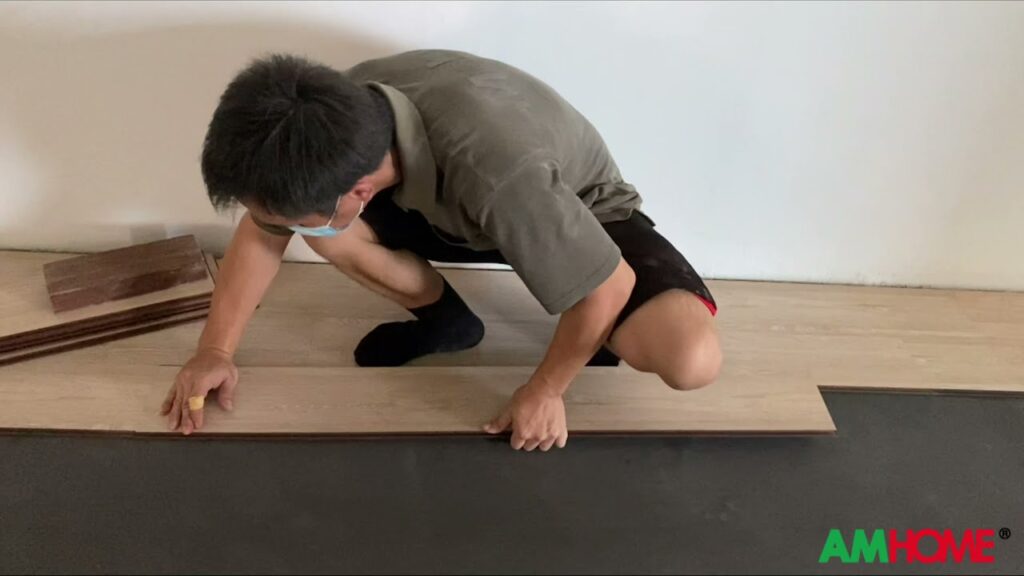
4. Laying the Vinyl Planks
When it comes to laying vinyl planks, precision and attention to detail are crucial for achieving a flawless finish. Before starting the installation process, it’s essential to ensure that the subfloor is clean, dry, and level. Any imperfections in the subfloor can cause the vinyl planks to buckle or show uneven wear over time.
Once the subfloor is ready, carefully measure the room to determine the starting point for the installation. It’s important to consider the layout of the planks and ensure that they align properly with the room’s dimensions. Many installers choose to start laying the planks along a straight wall to maintain a clean and uniform appearance.
As you begin laying the vinyl planks, make sure to leave a small expansion gap around the perimeter of the room. This gap allows the planks to expand and contract with changes in temperature and humidity, preventing them from buckling or becoming damaged over time. Additionally, using a tapping block and mallet can help ensure that the planks fit together snugly, creating a seamless and professional-looking installation.
After the planks are in place, it’s important to thoroughly clean the surface and remove any excess adhesive or debris. This final step will help ensure that the vinyl planks are securely in place and ready to withstand daily wear and tear for years to come.Sure! Here’s the SEO content for the H2 topic:
5. Finishing and Maintenance
Regular Inspections and Touch-ups
Maintaining the quality and appearance of your project requires regular inspections and touch-ups. Identify any areas that may need attention, such as scratches, dents, or worn-out finishes, and address them promptly. By staying proactive with maintenance, you can prevent larger issues from arising in the future.
Protective Coatings
Applying protective coatings can significantly extend the lifespan of your project. Whether it’s a protective sealant for outdoor surfaces or a clear coat for wooden fixtures, these coatings act as a barrier against environmental damage, UV rays, and wear and tear. Be sure to follow the manufacturer’s recommendations for reapplication intervals to ensure continued protection.
Professional Services
When it comes to finishing and maintenance, sometimes it’s best to rely on professional services. Whether it’s refinishing woodwork, resealing surfaces, or conducting thorough inspections, enlisting the expertise of professionals can ensure a high-quality finish and long-term durability for your project. Consider scheduling routine maintenance appointments to keep everything in top condition.
By incorporating these finishing and maintenance practices, you can preserve the integrity and aesthetics of your project for years to come. Prioritize regular inspections, protective coatings, and professional services to uphold the quality and functionality of your investment.